Steps to add VirtualDisk through XE command line.
The Citrix documentation says that each PV Virtual Machine can have up to 16 virtual disks attached.
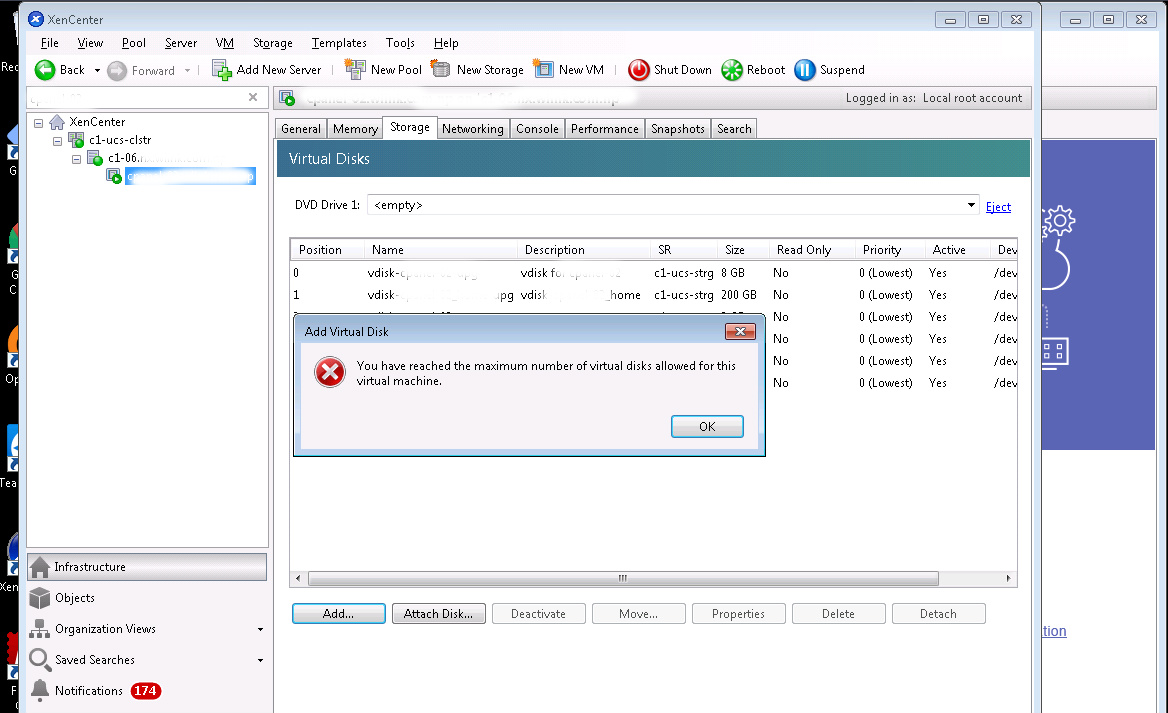
However, when I tried to add more than 6 virtual disks(1 for the VM, 5 for the data) using XenCenter, I got an error:
"You have reached the maximum number of virtual disks allowed for this virtual machine"
Follow below steps to add VirtualDisk in XenServer using XE command line.
STEP1: First get the UUID of the local Storage Repository(SR).
xe sr-list name-label="c1-strg"
  uuid ( RO) : de0fab79-de5g-2101-47ce-d7c1gf93e6f9
  name-label ( RW): c1-strg
  name-description ( RW): iSCSI SR [11.11.15.05 (*; LUN 0: 73463f13-7a1e-4f78-a608-826f85b811e9: 1105.9 GB (LIO-ORG))]
  host ( RO): <shared>
  type ( RO): lvmoiscsi
  content-type ( RO): user
STEP2: Get the UUID of the VM you want to attach the disk to.
xe vm-list name-label="backup.bdn.com.np"
  uuid ( RO) : 7c1e45g9-154f-2f86-5372-87fe5476628g
  name-label ( RW): backup.bdn.com.np
  power-state ( RO): running
STEP3: Create the Virtual Disk (VDI). I’m adding 25GB in backup.bdn.com.np Virtual Machine.
xe vdi-create sr-uuid=de0fab79-de5g-2101-47ce-d7c1gf93e6f9 name-label=backup.bdn.com.np_disk7 type=user virtual-size=25000000
  3ecda928-1527-de29-27ah-4193e2ca43b2
STEP4: Create the Virtual Block Device (VBD) that connects the VDI to the VM
xe vbd-create vm-uuid=7c1e45g9-154f-2f86-5372-87fe5476628g device=7 vdi-uuid=3ecda928-1527-de29-27ah-4193e2ca43b2 bootable=false mode=RW type=Disk
  19ca587b-240d-a55c-abd9-214218e29aeb
STEP5:
Plug the VBD into the VM. aka “Activate”.
At this point, the new disk will show up in XenCenter, but “Active” will say “No” and the Activate button will be available. You should be able to activate just fine here. This actually runs xe vbd-plug command. Therefore, You could run this command manually too.
xe vbd-plug uuid=19ca587b-240d-a55c-abd9-214218e29aeb
Now you can see the newly added VirtualDisk in your VM.


Leave a comment