Add and remove nodes in your Elasticsearch Cluster
Updated:
I will be adding a new node elk-04 in the existing 3 nodes Elasticsearch cluster and again remove it later.
I suggest you test the below steps in your staging environment first. I am working on ES version 7.5.1 with 3 nodes cluster where Xpack security is enabled. I have used self-signed certificates on my ES cluster.
I hope while configuring TLS during cluster setup earlier you have used –keep-ca-key option while generating certificates. It means the output zip file will contain ca/ca.key file along with ca/ca.crt file. ca.crt and ca.key are two CA (Certificate Authority) files that needed here to sign a new certificate for the node elk-04.
Elasticsearch has two levels of communications, Transport communications and HTTP communications. The transport protocol is used for internal communications between Elasticsearch nodes, and the HTTP protocol is used for communications from clients to the Elasticsearch cluster. In my case, I am going to define the certificate in only the transport part here.
Add new node elk-04 on /etc/hosts file of all nodes.
172.16.0.110 elk-01
172.16.0.111 elk-02
172.16.0.112 elk-03
172.16.0.115 elk-04
Download the same ES version and install it on a new node.
[root@elk-04 ~]# wget https://artifacts.elastic.co/downloads/elasticsearch/elasticsearch-7.5.1-x86_64.rpm
[root@elk-04 ~]# yum localinstall elasticsearch
Add new node in existing ES cluster
Step 1: Generate a new server certificate signed by existing ca.
[root@elk-01 lab-certs]# pwd
/root/lab-certs

[root@elk-01 lab-certs]# ls
drwxr-xr-x 2 root root   34 Aug  2 20:13 ca

[root@elk-01 lab-certs]# ls ca/
ca.crt  ca.key
Define your new node in yml syntax like below. If you want to add more nodes then you can define accordingly. Follow the yml syntax.
vim newnode.yml
 instances:
  - name: 'elk-04'
    dns: [ 'elk-04' ]
    ip: [ '172.16.0.115' ]
[root@elk-01 lab-certs]# ls
ca  newnode.yml
Now generate a new certificate for new node elk-04
The elasticsearch-certutil command simplifies the creation of certificates for use with Transport Layer Security (TLS) in the Elastic Stack.
/usr/share/elasticsearch/bin/elasticsearch-certutil cert --ca-cert ~/lab-certs/ca/ca.crt --ca-key ~/lab-certs/ca/ca.key --days 3650 --pem --in ~/lab-certs/newnode.yml --out ~/lab-certs/new_node.zip
Parameters
cert: Specifies to generate new X.509 certificates and keys. This parameter cannot be used with the csr or ca parameters.
–ca-cert : Specifies the path to an existing CA certificate (in PEM format). You must also specify the –ca-key : parameter. The –ca-cert parameter cannot be used with the ca or csr parameters.
–ca-key : Specifies the path to an existing CA private key (in PEM format). You must also specify the –ca-cert parameter. The –ca-key parameter cannot be used with the ca or csr parameters.
–days: Specifies an integer value that represents the number of days the generated certificates are valid. The default value is 1095. This parameter cannot be used with the csr parameter.
–pem: Generates certificates and keys in PEM format instead of PKCS#12. This parameter cannot be used with the csr parameter.
–in: Specifies the file that is used to run in silent mode. The input file must be a YAML file. This parameter cannot be used with the ca parameter.
–out: Specifies a path for the output files.
[root@elk-01 lab-certs]# ll
total 8
drwxr-xr-x 2 root root   34 Aug  2 20:13 ca
-rw-r--r-- 1 root root   82 Aug  2 20:15 newnode.yml
-rw------- 1 root root 2574 Aug  2 20:20 new_node.zip
[root@elk-01 lab-certs]# unzip new_node.zip
Archive:  new_node.zip
   creating: elk-04/
  inflating: elk-04/elk-04.crt
  inflating: elk-04/elk-04.key
You can verify the node certificate signed by particular CA or not. It should show OK.
[root@elk-01 lab-certs]# openssl verify -verbose -CAfile ca/ca.crt elk-04/elk-04.crt
elk-04/elk-04.crt: OK
If you want to look at the certificate details then execute below command. It will show certs details.
[root@elk-01 lab-certs]# openssl x509 -in elk-04/elk-04.crt -text -noout
Step 2: Now copy the new certificate and CA certificate to new node elk-04 and place it in /etc/elasticsearch/certs folder.
In elk-04 node:
mkdir /etc/elasticsearch/certs

[root@elk-04 certs]# pwd
/etc/elasticsearch/certs

[root@elk-04 certs]# ll
total 12
-rw-r--r-- 1 root elasticsearch 1200 Aug  2 20:36 ca.crt
-rw-r--r-- 1 root elasticsearch 1180 Aug  2 20:26 elk-04.crt
-rw-r--r-- 1 root elasticsearch 1679 Aug  2 20:26 elk-04.key
Step 3: configure elasticsearch.yml
vim /etc/elasticsearch/elasticsearch.yml
cluster.name: lab-elk
node.name: elk-04
node.master: true
node.data: true
bootstrap.memory_lock: false
network.host: 0.0.0.0
discovery.zen.ping.unicast.hosts: ["elk-01", "elk-02", "elk-03"]

indices.query.bool.max_clause_count: 8192
search.max_buckets: 250000
path.data: /var/lib/elasticsearch
path.logs: /var/log/elasticsearch
xpack.security.enabled: true
xpack.security.transport.ssl.enabled: true
xpack.security.transport.ssl.key: certs/elk-04.key
xpack.security.transport.ssl.certificate: certs/elk-04.crt
xpack.security.transport.ssl.certificate_authorities: [ "certs/ca.crt"]
Step 5: start ES service
systemctl start elasticsearch
systemctl enable elasticsearch
Now your new node is added to the Elasticsearch cluster. you can verify this through dev tools also.
GET _cluster/health

{
  "cluster_name" : "lab-elk",
  "status" : "green",
  "timed_out" : false,
  "number_of_nodes" : 4,
  "number_of_data_nodes" : 4,
  "active_primary_shards" : 36,
  "active_shards" : 72,
  "relocating_shards" : 0,
  "initializing_shards" : 0,
  "unassigned_shards" : 0,
  "delayed_unassigned_shards" : 0,
  "number_of_pending_tasks" : 0,
  "number_of_in_flight_fetch" : 0,
  "task_max_waiting_in_queue_millis" : 0,
  "active_shards_percent_as_number" : 100.0
}
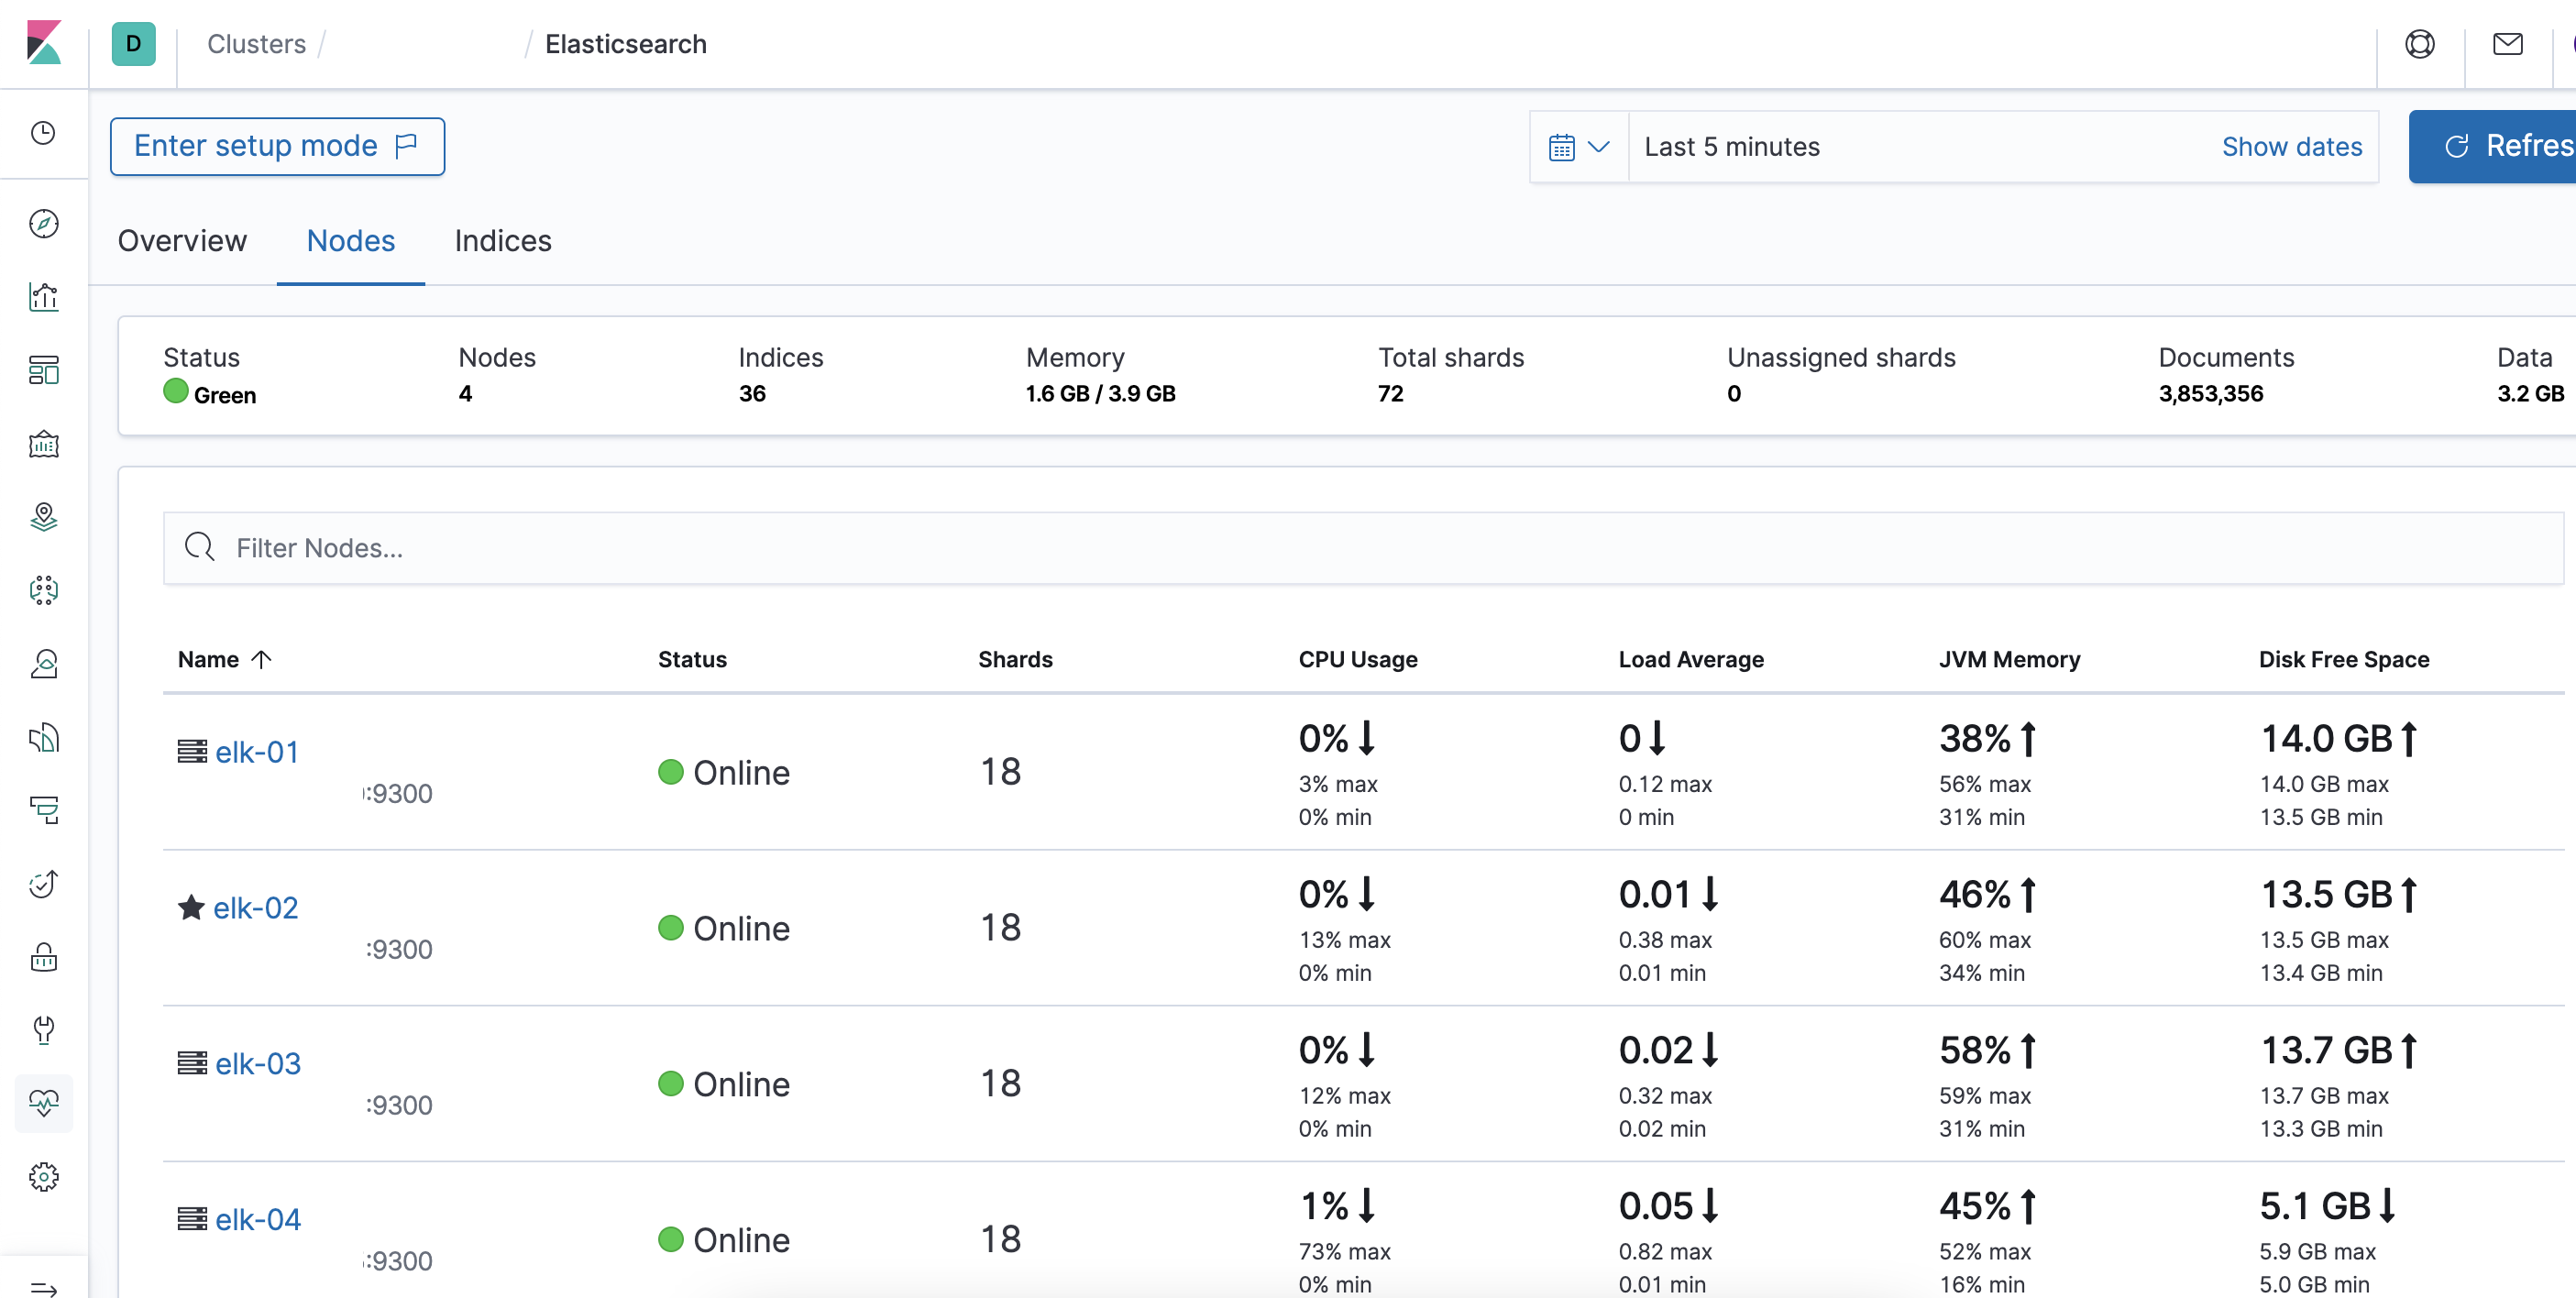
After new nodes added in cluster, ES instantly starts distributing shards between them. You can verify it through Kibana Stack Monitoring.
Remove node from existing ES cluster
Step 1: check all indices in removing the host first.
curl -s -u elastic:y3pphNGwzEeJXeWr7y8zcj -XGET "http://elk-01:9200/_cat/shards" | grep -i "elk-04"
.monitoring-kibana-7-2021.08.01   0 r STARTED   8610   1.8mb 172.16.0.115 elk-04
.monitoring-kibana-7-2021.07.30   0 r STARTED   8639   1.6mb 172.16.0.115 elk-04
.monitoring-logstash-7-2021.07.30 0 p STARTED 155466   9.6mb 172.16.0.115 elk-04
securelog-2021-07-20              0 r STARTED      4  74.4kb 172.16.0.115 elk-04
.monitoring-es-7-2021.07.28       0 p STARTED 380580 208.9mb 172.16.0.115 elk-04
.monitoring-es-7-2021.07.30       0 p STARTED 374714 191.8mb 172.16.0.115 elk-04
messageslog-2021-07-20            0 p STARTED     46 175.7kb 172.16.0.115 elk-04
.monitoring-logstash-7-2021.07.29 0 r STARTED 155466   9.6mb 172.16.0.115 elk-04
.apm-agent-configuration          0 p STARTED      0    284b 172.16.0.115 elk-04
.monitoring-logstash-7-2021.08.03 0 r STARTED  12114 949.6kb 172.16.0.115 elk-04
.monitoring-kibana-7-2021.08.03   0 p STARTED    673 192.1kb 172.16.0.115 elk-04
.monitoring-kibana-7-2021.08.02   0 p STARTED   8640   1.7mb 172.16.0.115 elk-04
filebeat-7.5.0-2021.06.10-000001  0 p STARTED   2660   1.6mb 172.16.0.115 elk-04
.monitoring-logstash-7-2021.08.02 0 p STARTED 155466   9.9mb 172.16.0.115 elk-04
.monitoring-kibana-7-2021.07.29   0 r STARTED   8640   1.5mb 172.16.0.115 elk-04
Step 2: Identify the IP address of the Elasticsearch node that needs to be removed from the cluster. When the command is executed, Elasticsearch tries to move the existing shards out of the node that will be removed and moves it to other nodes in the cluster.
PUT _cluster/settings
{
  "transient" :{
     "cluster.routing.allocation.exclude._ip" : "172.16.0.115"
   }
}
now execute Step 1 command again to verify or you can also verify through cluster health. relocating_shards shard should show 0 if everything goes fine.
GET _cluster/health
{
  "cluster_name" : "lab-elk",
  "status" : "green",
  "timed_out" : false,
  "number_of_nodes" : 4,
  "number_of_data_nodes" : 4,
  "active_primary_shards" : 37,
  "active_shards" : 74,
  "relocating_shards" : 0,
  "initializing_shards" : 0,
  "unassigned_shards" : 0,
  "delayed_unassigned_shards" : 0,
  "number_of_pending_tasks" : 0,
  "number_of_in_flight_fetch" : 0,
  "task_max_waiting_in_queue_millis" : 0,
  "active_shards_percent_as_number" : 100.0
}
Step 3: Now you can shutdown that node. or stop elasticsearch service.
systemctl stop elasticsearch
Step 4: Now remove above rule again.
PUT _cluster/settings
{
  "transient" :{
     "cluster.routing.allocation.exclude._ip" : ""
   }
}
If you check your cluster health again then you will find only 3 nodes in your cluster now.
GET _cluster/health

{
  "cluster_name" : "lab-elk",
  "status" : "green",
  "timed_out" : false,
  "number_of_nodes" : 3,
  "number_of_data_nodes" : 3,
  "active_primary_shards" : 36,
  "active_shards" : 72,
  "relocating_shards" : 0,
  "initializing_shards" : 0,
  "unassigned_shards" : 0,
  "delayed_unassigned_shards" : 0,
  "number_of_pending_tasks" : 0,
  "number_of_in_flight_fetch" : 0,
  "task_max_waiting_in_queue_millis" : 0,
  "active_shards_percent_as_number" : 100.0
}


Leave a comment