Site-to-Site VPN between Mikrotik router and Ubuntu 22.04 through strongSwan using IPsec IKEv2
Updated:
We will configure a site-to-site IPsec IKEv2 tunnel between the Mikrotik Router and the StrongSwan server. This will enable secure communication between devices connected behind the Mikrotik router and the StrongSwan server.
Install strongSwan in ubuntu
apt-get install strongswan libcharon-extra-plugins strongswan-pki
vim /etc/ipsec.conf
config setup
        charondebug="all"
        uniqueids=yes
        strictcrlpolicy=no
conn B1-TO-HO
        authby=secret
        left=%defaultroute
        leftid=2.2.2.2
        leftsubnet=172.16.2.0/24
        right=1.1.1.1
        rightsubnet=172.16.1.0/24
        ike=aes256-sha2_256-modp1024!
        esp=aes256-sha256-modp1024!
        keyingtries=0
        ikelifetime=1h
        lifetime=8h
        dpddelay=30
config setup: This section contains global configuration options for StrongSwan.
charondebug=”all”: This option sets the debugging level for the IKE daemon (charon) to “all”, which means it will log all debugging messages. This can be useful for troubleshooting.
uniqueids=yes: This option ensures that each IKE_SA (Internet Key Exchange Security Association) has a unique ID. This helps avoid conflicts in case multiple connections are established.
strictcrlpolicy=no: This option specifies whether strict certificate revocation list (CRL) checking is enforced. Setting it to “no” means that CRL checking will not be strictly enforced.
conn B1-TO-HO: This section defines a specific connection between two peers.
authby=secret: This option specifies that authentication will be performed using a shared secret key.
left=%defaultroute: This option specifies that the local endpoint (left side) of the connection will be determined based on the default route.
leftid=2.2.2.2: This option specifies the identity (ID) of the local endpoint. In this case, it’s set to the IP address 2.2.2.2.
leftsubnet=172.16.2.0/24: This option specifies the local subnet that will be accessible through the VPN tunnel.
right=1.1.1.1: This option specifies the IP address of the remote endpoint (right side) of the connection.
rightsubnet=172.16.1.0/24: This option specifies the remote subnet that will be accessible through the VPN tunnel.
ike=aes256-sha2_256-modp1024!: This option specifies the IKE (Internet Key Exchange) encryption algorithm, integrity algorithm, and Diffie-Hellman group to be used for negotiating phase 1 of the IPsec tunnel. In this case, AES 256-bit encryption, SHA-256 hashing, and MODP 1024-bit Diffie-Hellman group are used.
esp=aes256-sha256-modp1024!: This option specifies the ESP (Encapsulating Security Payload) encryption algorithm, integrity algorithm, and Diffie-Hellman group to be used for negotiating phase 2 of the IPsec tunnel. In this case, AES 256-bit encryption, SHA-256 hashing, and MODP 1024-bit Diffie-Hellman group are used.
keyingtries=0: This option specifies the number of attempts for establishing the IKE_SA. Setting it to 0 means that no retries will be attempted.
ikelifetime=1h: This option specifies the lifetime of the IKE_SA (Phase 1) in hours.
lifetime=8h: This option specifies the lifetime of the CHILD_SA (Phase 2) in hours.
dpddelay=30: This option specifies the delay (in seconds) before Dead Peer Detection (DPD) is initiated. DPD is used to detect if the peer is still reachable. In this case, DPD will be initiated after 30 seconds of inactivity.
set preshared key:
vim /etc/ipsec.secrets
# This file holds shared secrets or RSA private keys for authentication.

# RSA private key for this host, authenticating it to any other host
# which knows the public part.

2.2.2.2 1.1.1.1 : PSK $I8WC#53D@$#%#
2.2.2.2: This is the local endpoint’s IP address.
1.1.1.1: This is the remote endpoint’s IP address.
PSK: This indicates that a pre-shared key is used for authentication.
$I8WC#53D@$#%#: This is the actual pre-shared key used for authentication.
So, in this case, the pre-shared key $I8WC#53D@$#%# is used for authentication between the local endpoint with IP address 2.2.2.2 and the remote endpoint with IP address 1.1.1.1
systemctl restart strongswan-starter
Now we need to enable IP forwarding. The configuration line "net.ipv4.ip_forward = 1" enables IP forwarding on a Linux system. IP forwarding allows the system to forward packets from one network interface to another, essentially acting as a router or gateway.
vim /etc/sysctl.conf
net.ipv4.ip_forward = 1
root@int-vpn-01:~# sysctl -p
net.ipv4.ip_forward = 1
Allow traffic through ufw firewall
ufw allow from 1.1.1.1/32 proto udp to any port 500,4500 comment 'Mikrotik'
ufw route allow in on any out on any comment 'for VPN Traffic'
Mikrotik Configuration
 /ip ipsec profile
add name="DH_HO_Profile1" hash-algorithm=sha256 enc-algorithm=aes-256 dh-group=modp1024 lifetime=1d proposal-check=obey nat-traversal=yes dpd-interval=2m dpd-maximum-failures=5

/ip ipsec peer
add name="DH_HO_Peer1" address=2.2.2.2/32 profile=DH_HO_Profile1 exchange-mode=ike2 send-initial-contact=yes

/ip ipsec identity
add peer=DH_HO_Peer1 auth-method=pre-shared-key secret="$I8WC#53D@$#%#" generate-policy=no

/ip ipsec proposal
add name="DH_HO_Proposal1" auth-algorithms=sha256 enc-algorithms=aes-256-cbc lifetime=30m pfs-group=modp1024

/ip ipsec policy
add dst-address=172.16.2.0/24 peer="DH_HO_Peer1" proposal="DH_HO_Proposal1" sa-dst-address=2.2.2.2 sa-src-address=1.1.1.1 src-address=172.16.1.0/24 tunnel=yes
Further NAT rule:
/ip firewall nat
add chain=srcnat action=accept src-address=172.16.1.0/24 dst-address=172.16.2.0/24 log=yes log-prefix=""
Allow port 500/4500/UDP in Mikrotik
/ip firewall filter
add chain=input action=accept protocol=udp src-port="" dst-port=500,4500 log=n> log-prefix=""
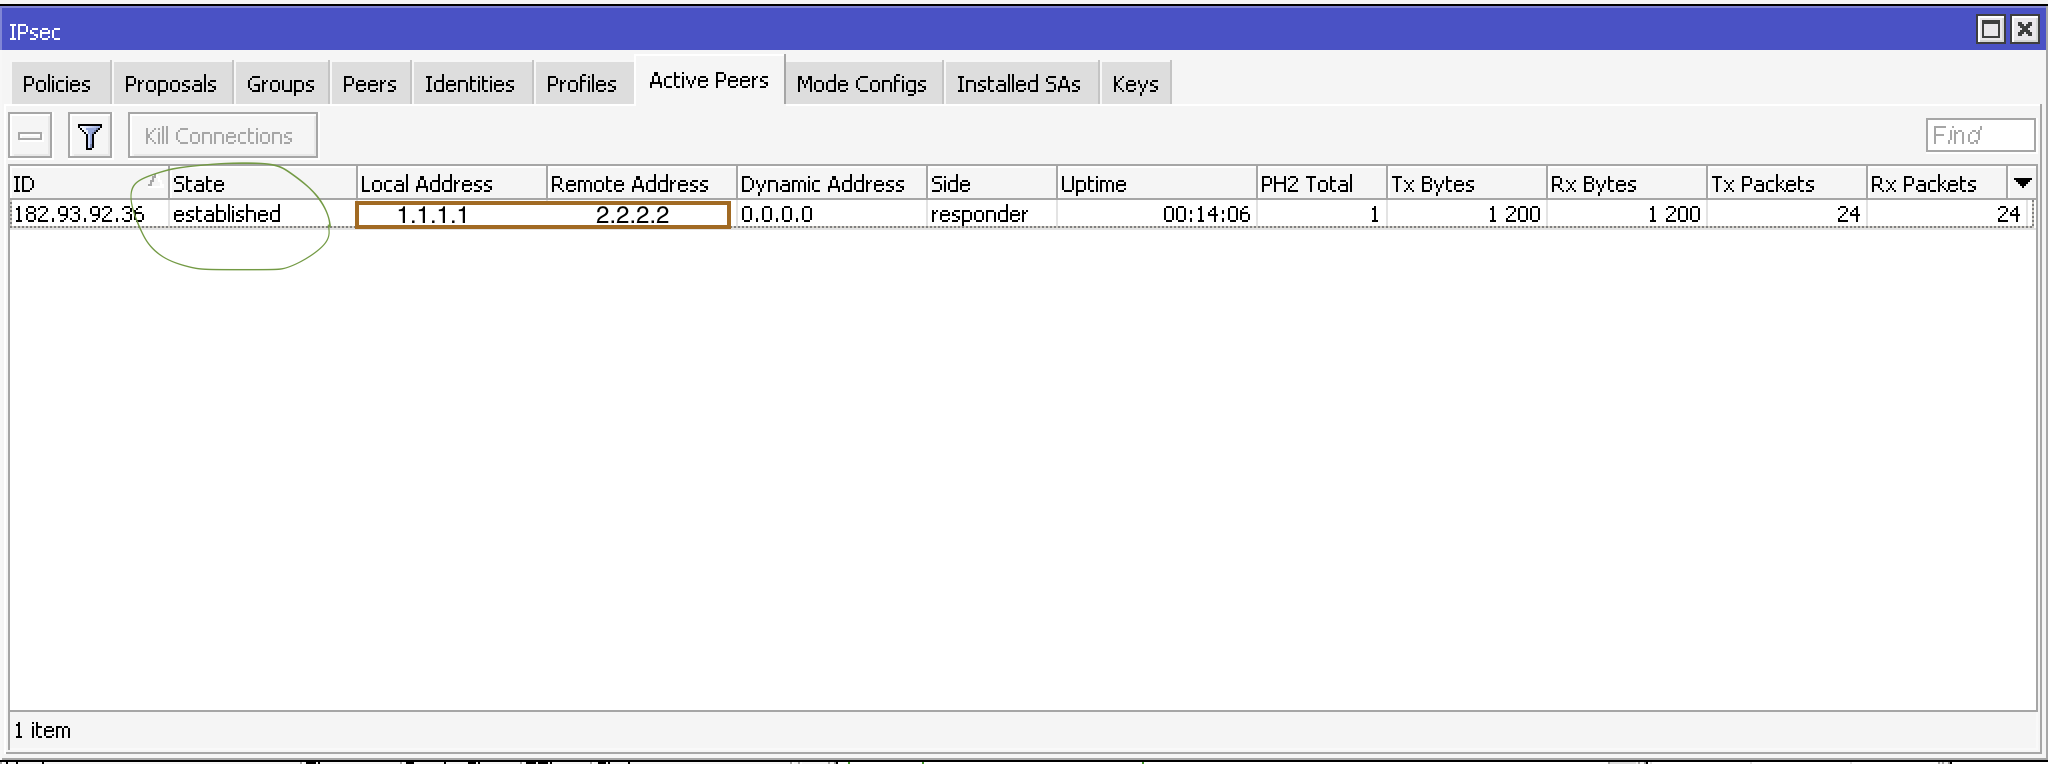
check phase 1 status:
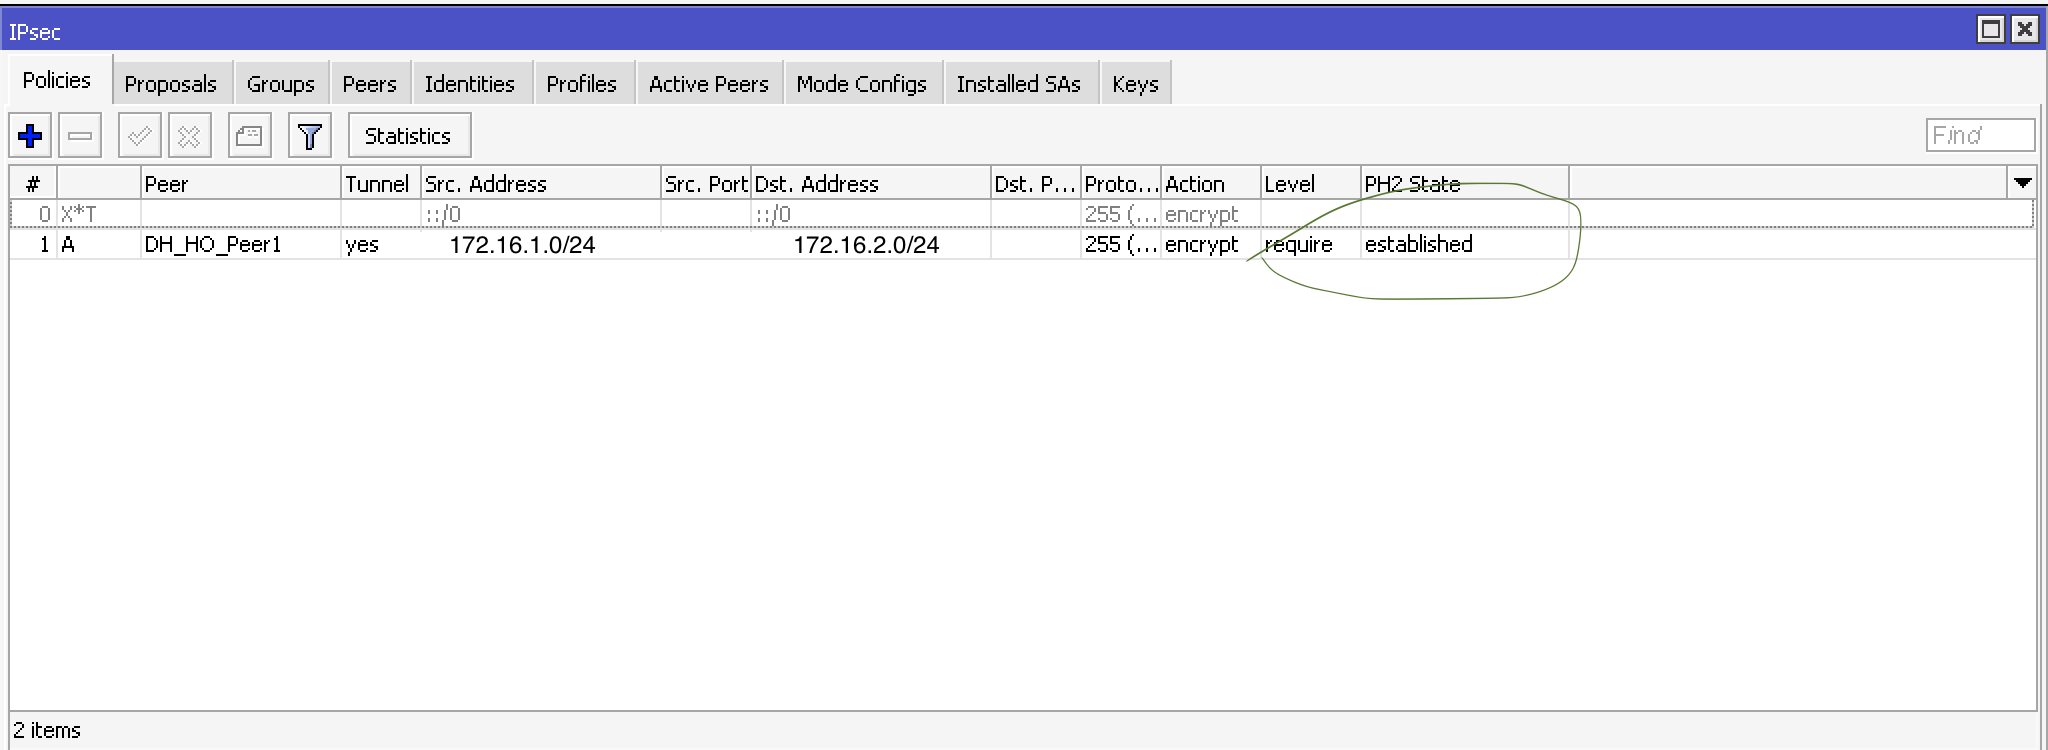
check phase 2 status:
open UDP port 500,4500 for remote server:

check connectivity:

check ipsec status in strongSwan VPN server:
root@int-vpn-01:~# ipsec status
Security Associations (1 up, 0 connecting):
 B1-TO-HO[13]: ESTABLISHED 5 minutes ago, 2.2.2.2[2.2.2.2]...1.1.1.1[1.1.1.1]
 B1-TO-HO{26}:  INSTALLED, TUNNEL, reqid 1, ESP in UDP SPIs: c006274a_i 01310acd_o
 B1-TO-HO{26}:   172.16.2.0/24 === 172.16.1.0/24
root@int-vpn-01:~#
Now our Mikrotik site can communicate with strongSwan site.
Additional,
You have to configure the static route on every node behind the VPN gateway server. Otherwise, the 172.16.1.0/24 network will not be able to reach other 172.16.2.x IPs.
ip route add 172.16.1.0/24 via 172.16.2.10


Leave a comment